
 Here's a super cool book that Danielle put together. It's called "Let's Play" and it includes tons of ideas and activities that keep kids entertained. Here's the downloadable link in PDF format and Publisher format. Thanks Danielle!!
Thursday, December 18, 2008
"Let's Play" Entertainment Book for Kids
Here's a super cool book that Danielle put together. It's called "Let's Play" and it includes tons of ideas and activities that keep kids entertained. Here's the downloadable link in PDF format and Publisher format. Thanks Danielle!!
Sunday, December 14, 2008
Emergency Preparedness Gifts
A great gift to give this season is a gift of Emergency Preparedness. Beprepared.com has many gifts to start or finish a 72 hour kit or car kit. A Cub Scout or Boy Scout would love any of these items on the list. They are great for camping and emergency survival! Here are some examples of some great inexpensive presents.
- Magnesium Fire Starter - $6.95
- Fire Sticks - $1.95
- Fire Lighters - $2.95
- Waterproof/Windproof Matches - $2.95
- Hotties - .95 to $1.25
- Emergency Blanket - $1.25
- Emergency Poncho - .75
- Deluxe Poncho - $2.95
- Endurance Headlamp - $4.95
- Flashlight - $7.99
- Emergency Tent - $3.95
- 13-Function Knife - $1.99
- Multifunction Tool - $4.95
- 5-in-1 Survival Whistle - $1.50
- 1st Aid Kit - $5.95
- Basic 72 Hour Kit - $9.50
Of course prices are subject to change.
Wednesday, December 10, 2008
Inexpensive Christmas Gifts (SRS Meeting - December 4, 2008)
We had a great meeting on Thursday learning all about inexpensive Christmas gifts and great dessert recipes made from food storage.
Neighborhood Gift Ideas (Deseret News, November 15, 2006)
Gifts from the heart are far more valuable than anything you could ever buy. They often take more energy, thought, and sacrifice, so they mean more to both the giver and the receiver. Here are some ideas for priceless gifts you can give this Christmas.
 Danielle made these super cute and super awesome tutu and cape for her kids. Here's a tutorial for the No Sew Tutu and here's how you make this super easy superhero cape. You will need
3/4 yard of superhero fabric (45/46" wide)
matching thread
sewing machine
Your fabric should be 27" long by 45/46" wide. Cut a 1" strip of fabric off of the 45/46" long, so that your fabric now measures 26" by 45/46". This 1" strip will be used for the cape tie. Gather the 45/46" side so that it now measures 10" long (lots of gathers!). Find the center of your tie and the center of the stitches and match them up wrong sides together. Sew 1/4" seams. Fold tie around to other side of cape, press and then topstitch down. Hem bottom of cape with a rolled hem. Viola! Instant superhero.
Growth Chart

This is a great growth chart that works great in apartments since you can take it with you when you move. Paint a 6 foot by 9 inch wide board in the color of your choice. Stencil the numbers 1-6 every foot and then make a small mark for each inch in between, or each 6 inches.

Attach a picture hanger to the back and you're ready to go!
Here's the supplies for mine. I bought a 6' piece of crown or base molding (instead of a wooden board) and bought 3" wooden numbers (instead of stenciling). Now I just have to stain it and attach the numbers!

Personalized ABC or Word Books
Danielle made each of her children their own personalized books. Each page has a different letter or word made with pictures of her children. She laminated each book for durability and also had them spiral bound. Here's some sample pages from their books.


Scrapbook Journal
 Take a composition notebook and make it into a personalized gift by adding scrapbook paper and embellishments. An easy beautiful gift! Here's a great quote to put inside the front cover.
The Value of Keeping a Journal
"People often use the excuse that their lives are uneventful and nobody would be interested in what they have done. But I promise you that if you will keep your journals and records, they will indeed be a source of great inspiration to your families, to your children, your grandchildren, and others, on through the generations. Each of us is important to those who are near and dear to us—and as our posterity read of our life's experiences, they, too, will come to know and love us. And in that glorious day when our families are together in the eternities, we will already be acquainted."
-President Spencer W. Kimball
"Let's Play" Entertainment Book for Kids
Here's a super cool book that Danielle put together. It's called "Let's Play" and it includes tons of ideas and activities that keep kids entertained. Check back in a few days for the downloadable link for her book. Thanks Danielle!!
Handmade Cards
Make a variety of handmade cards from scrapbook paper. Some ideas are birthday, thank you, thinking of you, miss you, get well soon, anniversary, & sympathy. Bundle these up and give as a Christmas gift. This is a gift they can use throughout the year!
Magnet Words
Buy some inexpensive clear rocks at Wal-mart or a local craft store. Print fun words or your child's name on some scrapbook paper. Cut out the paper to the shape of the rock and attach a magnet on the back. Great fun for the fridge and the kids!

Gifts in a Jar (or bag) There are so many different mixes that you can give in a jar. Search "gifts in a jar" and you will get tons of results on the Internet. My favorite idea spot for these is Organized Christmas.

Basic Egg Noodle recipe
2 Tbsp oil
4 large eggs
1 Tbsp water
3 1/2 cups flour
Place eggs, water, and flour in a bowl. Beat with flat beater. Turn to Speed 2 and mix 30 seconds. Remove flat beater and attach dough hook. Turn to Speed 2 and knead for 2 minutes. Hand knead dough for 30 seconds to 1 minute. Cover with a dry towel and let rest 15 min. Roll it out on a counter until it is paper thin and cut i strips or desired size or put it through the pasta maker. IF you are giving as a gift make sure they are dried completely.
Mint Candy Ornaments
 Here's a great tutorial on how to make these simple and cute ornaments for the tree!
Personal History Gift
 A gift of your personal history or someone is your family is always such a cherished, memoriable gift.
Cookbook
 Many people loved the idea of a homemade cookbook to give or receive as a gift. Here are some great ideas for your own recipe book.
Emergency Pocket Kit


Neighborhood Gift Ideas (Deseret News, November 15, 2006)
- Bag of mini carrots and veggie dip - We know you are 24 "carrot" neighbors! What a treasure! Have a happy holiday!
- Set of measuring spoons and cups - Wishing you joy beyond "measure" this holiday season.
- Bag of pistachios or peanuts in shells - Don't go "nuts" this Christmas! From your "nutty" neighbors.
- Christmas paper plates, napkins, cups and plastic utensils -- A bit of "disposable" Christmas cheer! What could be better? No dishes, my dear!
- Bolt of Christmas ribbon & wrapping paper - This simple gift is meant to help you "tie" up those loose ends this Christmas season!
- Mittens (fill with tape, scissors, tags and pen) - Let us "lend" you a "hand" this Christmas season!
- Christmas Cookie cutter - "Cutting" out a perfect Christmas wish for you.
- Flashlight - We love how you "light up" our lives. We've come to depend on your "glow." Here's a flashlight to store, so you'll always be sure to create "light" wherever you go!
- Bounty paper towels - This season may the "absorbing" spirit of Christ "blot" out your problems, "soak up" your sorrows, and "wipe" away your difficulties and may the new year bring you "bounteous" blessings all the year through!
Gifts from the heart are far more valuable than anything you could ever buy. They often take more energy, thought, and sacrifice, so they mean more to both the giver and the receiver. Here are some ideas for priceless gifts you can give this Christmas.
- Give the gift of yourself to your family and loved ones. Spend the day doing kind things for your parents and siblings. You could make breakfast, help wrap and deliver presents, or clean up after dinner.
- Give your parents a break. Spend some time looking after your younger brothers and sisters during the Christmas holiday.
- Volunteer at a local food bank or shelter, or help with some other worthy cause.
- Visit someone who is sick or elderly. Ask him or her to tell you about a past Christmas.
- Express your love and gratitude for the Savior in your prayers.
- Christmas is a time for peace. Try to resolve differences with someone you don’t get along with very well.
- You can also encourage peace by not quarreling with your siblings. Try to treat your family as well as you possibly can.
- Write a letter to your parents thanking them for the things they have done for you.
- Write letters to full-time missionaries from your ward or branch to encourage them and to let them know you remember them in your prayers.
- Make your brother’s or sister’s bed without letting anyone know who did it.
- Baby-sit for free so parents can enjoy an outing to a Christmas concert, attend the temple, or spend time together.
- Read the Christmas story to a younger brother or sister, and teach them about the Savior (see Luke 2).
- If you’ve saved some money by giving free gifts this Christmas, you can pay a generous fast offering next month.
Homemade Gifts (Gene R. Cook, "Homemade Christmas" Liahona, December 2003)
What the true spirit of Christmas is all about—commemorating Jesus’ birth and enjoying the spirit of giving, loving, and caring for one another—seemed to be drowned out, at least for us, in the hustle and bustle. We felt great pressure to buy gifts for others, perhaps more out of obligation than in the true spirit of giving.
We asked ourselves how we could put the true spirit of giving into Christmas (and birthdays) more than we normally did. We decided to use the following guidelines:
1. Few, if any, gifts may be purchased.
2. Most gifts must be made using your own hands or given from your own time.
3. Few, if any, parts for the gifts may be purchased. You must improvise.
4. You must give of your own time, talents, and self, immersing yourself in the needs of the receiver.
This has been a great experience for our family. We have found that in following such rules we think more deeply about, even pray about, the person to determine what his or her real needs and wants are. Working on a meaningful gift many months before birthdays or Christmas helps us internalize the spirit of giving. This method has also helped us realize that we can be more self-sufficient than we thought.
Gift Certificates to Neighbors
There are other kinds of gifts that we give to neighbors and friends. We call them family gift certificates. On a piece of paper, we draw up a certificate that lists the person’s name and indicates a service to be given. Some of the certificates show the following:
- One free shoveling of snow from a driveway
- One free lawn-mowing job
- One free garage cleaning
- One free car wash
- One free piano recital from one of our children
- Two free loaves of bread (not from Mom, but from the children)
- Free baby-sitting
- Two hours of repair work for a widow
- One free fireside to teach the gospel
Again, these personal kinds of gifts carry extra meaning.
Gift Certificates to Family Members
We give these same kinds of gift certificates to family members, including the following:
- Make your bed seven times (exchanged among the children)
- Do the dishes three times at any time you want to redeem the certificate
- One hour at the piano with Dad singing
- One mountain trip
- Clean the garage for you
- Six one-hour periods alone with Mom or Dad
- Six one-hour times of peace and harmony (offered to Dad and Mom)
- Twelve letters, one per month, for a year (offered to a distant mother)
Here are some great inexpensive Christmas gifts that were shared at our meeting!!
No Sew Tutu (except for the elastic) & Superhero CapeDanielle made these super cute and super awesome tutu and cape for her kids. Here's a tutorial for the No Sew Tutu and here's how you make this super easy superhero cape. You will need3/4 yard of superhero fabric (45/46" wide)
matching thread
sewing machine
Your fabric should be 27" long by 45/46" wide. Cut a 1" strip of fabric off of the 45/46" long, so that your fabric now measures 26" by 45/46". This 1" strip will be used for the cape tie. Gather the 45/46" side so that it now measures 10" long (lots of gathers!). Find the center of your tie and the center of the stitches and match them up wrong sides together. Sew 1/4" seams. Fold tie around to other side of cape, press and then topstitch down. Hem bottom of cape with a rolled hem. Viola! Instant superhero.
Growth Chart
This is a great growth chart that works great in apartments since you can take it with you when you move. Paint a 6 foot by 9 inch wide board in the color of your choice. Stencil the numbers 1-6 every foot and then make a small mark for each inch in between, or each 6 inches.
Attach a picture hanger to the back and you're ready to go!
Here's the supplies for mine. I bought a 6' piece of crown or base molding (instead of a wooden board) and bought 3" wooden numbers (instead of stenciling). Now I just have to stain it and attach the numbers!

Personalized ABC or Word Books
Danielle made each of her children their own personalized books. Each page has a different letter or word made with pictures of her children. She laminated each book for durability and also had them spiral bound. Here's some sample pages from their books.
Scrapbook Journal
Take a composition notebook and make it into a personalized gift by adding scrapbook paper and embellishments. An easy beautiful gift! Here's a great quote to put inside the front cover.The Value of Keeping a Journal
"People often use the excuse that their lives are uneventful and nobody would be interested in what they have done. But I promise you that if you will keep your journals and records, they will indeed be a source of great inspiration to your families, to your children, your grandchildren, and others, on through the generations. Each of us is important to those who are near and dear to us—and as our posterity read of our life's experiences, they, too, will come to know and love us. And in that glorious day when our families are together in the eternities, we will already be acquainted."
-President Spencer W. Kimball
"Let's Play" Entertainment Book for Kids
Here's a super cool book that Danielle put together. It's called "Let's Play" and it includes tons of ideas and activities that keep kids entertained. Check back in a few days for the downloadable link for her book. Thanks Danielle!!
Handmade Cards
Make a variety of handmade cards from scrapbook paper. Some ideas are birthday, thank you, thinking of you, miss you, get well soon, anniversary, & sympathy. Bundle these up and give as a Christmas gift. This is a gift they can use throughout the year!
Magnet Words
Buy some inexpensive clear rocks at Wal-mart or a local craft store. Print fun words or your child's name on some scrapbook paper. Cut out the paper to the shape of the rock and attach a magnet on the back. Great fun for the fridge and the kids!
Gifts in a Jar (or bag)
There are so many different mixes that you can give in a jar. Search "gifts in a jar" and you will get tons of results on the Internet. My favorite idea spot for these is Organized Christmas.
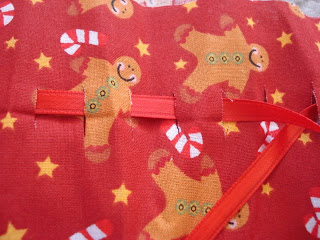
Anjalique puts her "Granola in a Jar" in a bag, so that it won't break while mailing. To make this cute (almost no sew) bag you will need:
Fabric 20" tall by 9 wide
Ribbon 18-20" long.
Fold the fabric in half so that it measures 10" x 9". Sew up the 2 10" sides wrong sides together, using 1/4" seam allowance. Now your bag should measure 10x8. Now carefully cut 1/2" slits approximately 1 1/2" down from the top of the bag and approximately 1/2" apart. Thread ribbon into slits and your bag is done.
 Fill a Ziploc with the "gift in a jar" ingredients, slip into your bag and tie closed.
Anjalique also includes a double sided gift tag. One side has the instructions for making the granola from the ingredients in the bag 
How to make this granola:
Dump contents of bag into a large bowl and stir. In a separate bowl, combine 1/4 + 2 TBSP honey (or maple syrup), 1/4 cup oil, and 1/4 tsp salt. Combine both mixtures and pour onto one large or two small cookie sheets. Cook 30-35 minutes, stirring halfway through to achieve an even color. Remove from oven and transfer into a large bowl. Stir in 1 cup raisins, if desired. Then, enjoy!
and the other side has the instructions for making the granola from scratch. 
Granola (from scratch)
3 cups rolled oats
1 cup sliced almonds (or any amount)
3/4 cup shredded sweet coconut
1/4 cup + 2 Tbsp. brown sugar
1/4 cup + 2 Tbsp. honey (or maple syrup)
1/4 cup vegetable oil
1/4 tsp. salt
Preheat oven to 250º. In a large bowl, combine oats, nuts, coconut, and brown sugar. In a separate bowl, combine honey, oil, and salt. Combine both mixtures and pour onto one large or two small cookie sheets. Cook 30-35 minutes, stirring halfway through cooking to achieve even color. Remove from oven. (Optional: Transfer to large bowl and stir in 1 cup raisins,)
Another "Gift in a Jar" is to give a refillable Tupperware for a family member. This one is filled with different rice recipes, and whenever it runs empty, it can be returned for a refill. What a great idea!

Basic Egg Noodle recipe
2 Tbsp oil
4 large eggs
1 Tbsp water
3 1/2 cups flour
Place eggs, water, and flour in a bowl. Beat with flat beater. Turn to Speed 2 and mix 30 seconds. Remove flat beater and attach dough hook. Turn to Speed 2 and knead for 2 minutes. Hand knead dough for 30 seconds to 1 minute. Cover with a dry towel and let rest 15 min. Roll it out on a counter until it is paper thin and cut i strips or desired size or put it through the pasta maker. IF you are giving as a gift make sure they are dried completely.
Mint Candy Ornaments
Here's a great tutorial on how to make these simple and cute ornaments for the tree!Personal History Gift
A gift of your personal history or someone is your family is always such a cherished, memoriable gift.Cookbook
Many people loved the idea of a homemade cookbook to give or receive as a gift. Here are some great ideas for your own recipe book.- Scan in the original handwritten recipe and include that along with the typewritten recipe.
- Put all recipes in a 3 ring binder to make it easy to add new pages.
- Include pictures of the event where the dish was served or a picture of the person who usually makes the dish
- Include stories about the dish/recipe
- Include a Table of Contents (if possible)

- Place recipes in protective sleeves to keep them safe in the kitchen

- You can also include a cute accessory with your cookbook gift. Anjalique filled these wisks with chocolate candy to go with her cookbook.

Emergency Pocket Kit

This is a cute little emergency kit that I saw in an Etsy shop. It was such a cute and simple idea that I thought I'd make a few for Christmas this year. It was easy, except that the Ziploc bags are really slippery! It's a little bag that's filled with items of your choice (Band-Aids, wet wipes, medicine, Kleenex, safety pins, cough drops, toilet seat cover, etc). Here's the tutorial for this little kit.
Crayon Rolls
Skip to my Lou has a great tutorial on making these cute and simple crayon rolls. Doesn't every child needs one of these?


Recycled Crayons
Crafty Dasies has a great tutorial on making recycled crayons. I made the above crayons by using her tutorial and a muffin tin. I also made snowman crayons by using a candy/ice mold and the microwave. Here's how:
Put "like color" crayon pieces into a microwave safe cup/mug and heat for 30 seconds to 2 minutes, depending on how many crayon pieces you have in the mug. When it's melted, pour into a cute shaped ice cube tray or candy mold. I found my snowman and santa ones at Deseret Industries for .50 each. Don't use ones that you love or paid a lot of money for, because mine broke when I pulled it out of the freezer.
Aren't these snowmen so cute!!! I love them!!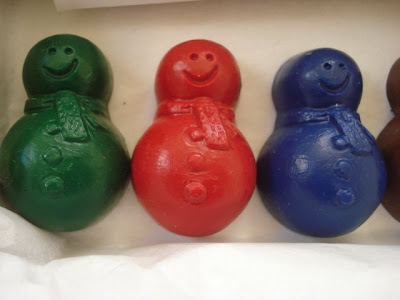
For the snowmen, I found a tin that fit the 8 colors perfectly and had some room to spare for a few sheets of blank paper (rolled up and tied) for coloring. This one is for my nephew :)
Recipes from SRS Meeting - December 4, 2008
We had so many wonderful recipes to try at our SRS Meeting on Thursday! Here they are for you to try!
Candy Cane Marshmallows
Use the basic vanilla marshmallows (found here). Add 2 1/3 cups sugar to the mix & then add 2/3 cup candy cane at the VERY end, right before pouring.
Magic Milk Shakes
1 1/2 - 2 cups ICE water- really, really cold.
1 1/4 cups non-fat dry milk powder
2/3 cup sugar
1/3 cup unsweetened cocoa
2-3 cups ice cubes
2 TBSP vegetable oil (it’s an emulsifier)
Place ALL the ingredients in the blender, including the oil. Use less water for a thicker milkshake or more for a shake that’s easier on your blender motor. With lid on, process for two minutes. Makes about 4 shakes.
Granola
3 cups rolled oats
1 cup sliced almonds (or any amount)
3/4 cup shredded sweet coconut
1/4 cup + 2 Tbsp. brown sugar
1/4 cup + 2 Tbsp. honey (or maple syrup)
1/4 cup vegetable oil
1/4 tsp. salt
Preheat oven to 250º. In a large bowl, combine oats, nuts, coconut, and brown sugar. In a separate bowl, combine honey, oil, and salt. Combine both mixtures and pour onto one large or two small cookie sheets. Cook 30-35 minutes, stirring halfway through cooking to achieve even color. Remove from oven. (Optional: Transfer to large bowl and stir in 1 cup raisins,)
Oatmeal Cranberry White Chocolate Chip Cookies
2/3 cup white beans mashed
2/3 cup brown sugar
2 large eggs
1 1/2 cups old-fashioned oats
1 1/2 cups flour
1 tsp baking soda
1/2 tsp salt
1 (6 oz) package Ocean Spray Craisins Original Sweetened Dried Cranberries
2/3 cup white chocolate chunks or chips
Preheat oven to 375ºF. Using an electric mixer, beat butter or margarine and sugar together in a medium mixing bowl until light and fluffy. Add eggs, mixing well. Combine oats, flour, baking soda and salt in a separate mixing bowl. Add to butter mixture in several additions, mixing well after each addition. Stir in sweetened dried cranberries and white chocolate chunks.
Drop by rounded teaspoonfuls onto ungreased cookie sheets. Bake for 10-12 minutes or until golden brown. Cool on wire rack. Makes approximately 2 1/2 dozen cookies. (Bean Substitution 1 to 1 beans for butter)
Pinto Bean Fudge
1 cup cooked, soft pinto beans, drained & mashed
1/4 cup milk
1 TBSP vanilla
2 lbs powder sugar
6 oz unsweetened chocolate
6 TBSP butter or margarine
Nuts (optional)
In a large bowl stir beans and milk together, adding enough milk to resemble mashed potatoes in consistency; stir in vanilla. Melt chocolate and butter and stir into bean mixture. Add nuts. Gradually stir in powdered sugar to get it well blended. Spread onto lightly buttered 9 inch baking dish or form into two 1 1/2 inch rolls chill 1 to 2 hours. Cut into pieces. Refrigerate.
Cinnamon-Raisin Bars
½ cup butter
1 cup brown sugar
½ tsp salt
½ tsp soda
1 ½ cup flour
1 ½ cup quick oats
Raisin Filling
Cinnamon Icing
Cream Butter and sugar. Sift together dry ingredients; stir into creamed mixture. Add oats and 1 Tbsp water. Mix until crumbly. Firmly pat half the mixture in greased 9 x 13 pan. Spread with Raisin Filling. Mix remaining crumbs and 1 Tbsp water; spoon over filling; pat smooth. Bake in oven about 35 min at 350 degrees. Cool. Drizzle with Cinnamon Icing. Makes 2 ½ dozen.
Raisin Filling:
Combine ¼ cup granulated sugar and 1 Tbsp cornstarch in saucepan. Stir in 1 cup water and 2 cups raisins. Cook over medium heat till thickened and bubbly. Cool.
Cinnamon Icing:
Mix 1 cup sifted powdered sugar with ¼ tsp ground cinnamon. Stir in enough milk, about 1 Tbsp, for drizzling.
Tuesday, November 11, 2008
Beans, Rice & Corn (SRS Meeting - November 6th 2008)
 Black Beans
Complete Protiens
In general, animal proteins (meat, fish, poultry, milk, cheese, and eggs) are considered good sources of complete proteins. A complete protein or whole protein is a protein that contains all of the essential amino acids.
Vegetable proteins (grains, legumes, nuts, seeds, and other vegetables) are incomplete proteins because they are missing, or do not have enough of, one or more of the essential amino acids. By combining foods you can create a self-made complete protein.
When combining foods like beans with rice or corn at the same meal (or separately throughout the day), your body receives all nine essential amino acids.
There are other combinations as well. Beans and seeds, beans and nuts, and beans and grains You can combine the following vegetable proteins to make complete proteins.
Beans and Rice is a great way to get a complete protein when meat is scarce. Other examples are Peanut butter on whole-wheat bread, Whole-wheat bun with Humus, Rice and Bean soup and a roll, Rice cakes with peanut butter, Tofu-vegetable stir-fry over rice or pasta.
Information from: www.fitsugar.com & www.bodyforlife2.com
Rice
The good news is that rice is a healthy food. The USDA recommended allowance of rice and other grain-based foods is 6 to 11 servings daily.
Interesting Nutrition Facts about rice: White Rice contains 103 calories per half-cup and 108 calories per half-cup serving of brown rice It is cholesterol, sodium, and gluten-free. It has only a trace of fat and is a complex carbohydrate.
Brown Rice
Rice from which only the hull has been removed is called brown rice. When cooked, it has a slightly chewy texture and a nut-like flavor. Brown rice is a natural source of bran. It cooks in approximately 40-45 minutes. Brown rice can only be stored for 6 months, the higher fat content can make it go rancid if stored for too long.
White Rice
White rice has been completely milled and polished, removing the bran layer. Vitamins and minerals are added for enrichment. It cooks in about 15 minutes
Polenta
Polenta is made with ground yellow or white cornmeal, (ground maize). It can be ground coarsely or finely depending on the region and the texture desired. As it is known today, polenta derives from earlier forms of grain mush commonly eaten in Roman times and after. Early forms of polenta were made with such starches as the grain farro and chestnut flour, both of which are still used in small quantity today. When boiled, polenta has a smooth creamy texture due to the gelatinization of starch in the grain, though it may not be completely homogenous if a coarse grind or a particularly hard grain such as flint corn is used.
Polenta was originally a peasant food. However, since the late 20th century, polenta has become a premium product. Polenta dishes are on the menu in many high-end restaurants. Many current polenta recipes have given new life to an essentially bland and common food, invigorating it with various cheeses or tomato sauces.
Black Beans
Research published in the Journal of Agriculture and Food Chemistry indicates that black beans are as rich in antioxidant compounds called anthocyanins as grapes and cranberries, fruits long considered antioxidant superstars.
When researchers analyzed different types of beans, they found that, the darker the bean's seed coat, the higher its level of antioxidant activity. Gram for gram, black beans were found to have the most antioxidant activity, followed in descending order by red, brown, yellow, and white beans. most antioxidant activity, followed in descending order by red, brown, yellow, and white beans.
Overall, the level of antioxidants found in black beans in this study is approximately 10 times that found in an equivalent amount of oranges, and comparable to that found in an equivalent amount of grapes or cranberries. So eat up!
Information from www.whfoods.com
Beans Tidbits:
- A pound of beans measures about 2 cups.
- Beans triple in volume when soaked and cooked.
- A cup of dry beans yields 3 cups cooked.
- A pound of dry beans yields 6 cups cooked.
- Use 3 cups of water per cup of dry beans for soaking.
- Simmer each pound of beans 2 hours after soaking.
- A pound of dry beans makes about 9 servings of baked beans.
- A pound of dry beans makes about 12 servings of bean soup.
- A one-pound can of cooked beans measures about 2 cups.
Tortillas Yesterday & Today
According to Mayan legend, tortillas were invented by a peasant for his hungry king in ancient times. The first tortillas, which date approximately 10,000 years before Christ, were made of native corn with dried kernel. Today, corn tortillas are made from either corn cooked in a lime-based solution or by using corn flour, producing a dough, forming it like a pancake and finally baking it in an oven. Among native Mexicans, tortillas are also commonly used as eating utensils. In the Old West, "cowpokes" realized the versatility of tortillas and used tortillas filled with meat or other foods as a convenient way to eat around the campfire. Thanks in part to the widespread popularity of Mexican and Southwestern cuisines, Americans love tortillas. In fact, tortillas are more popular today in the U.S. than all other ethnic breads, such as bagels, English muffins and pita bread.As testament to their popularity, the Tortilla Industry Association (TIA) estimates that Americans consumed approximately 85 billion tortillas in 2000 (not including tortilla chips).
Information from: www.tortilla-info.com
Mexican Pinto Beans & Tortillas
Here is Tonya with her video on how to make Beans, Tortillas & Refried Beans.
Mexican Pinto Beans
A tasty way to use the dry beans in your food storage!
1 lb (2 cups) of dry pinto beans
1 can of roast beef, not drained
1 small can of tomato sauce
½ can of diced tomatoes with green chilies
¼ of a bell pepper, diced
2 TBSP dehydrated onions
1 tsp "Better Than Bullion" paste in beef flavor (beef bullion cube also works)
1 tsp ground cumin, or to taste
Mexican oregano, to taste
garlic salt, to taste
Garnish
Chopped cilantro
Diced green onion
Diced white or yellow onion
Diced tomatoes
Cotija cheese
Rinse and sort beans, discard any foreign objects or suspicious beans. Place beans in a large bowl and cover with 3-4 inches in water, soak over night (6-8 hours). Pour out soaking water and rinse beans again. Place beans in a large pot (with a lid) and cover with 2 inches of water; bring to a boil not covered, stirring occasionally. Cover with lid askew to vent, turn down heat, and let beans simmer for 1 ½ hours, occasionally stirring.
Add the rest of the ingredients and continue to simmer and stir until beans are very tender and water has boiled off to the desired consistency, about 1-2 hours. As a note, water can be added or scooped out to reach desired consistency. Spoon beans into bowls, top with garnish and sprinkle with cotija cheese.
Refried Beans
1-2T chorizo, to taste
1-2 cups of beans from Mexican pinto beans
Juice from Mexican pinto beans
milk
Brown the chorizo in a sauce pan over medium heat. With a slotted spoon scoop out some of the beans, about 1-2 cups depending on how much you want to make. Turn heat down to med-low. Use a potato masher to mash beans and incorporate chorizo. Stir in juice from beans and milk in small amounts till beans become smooth and are just beginning to simmer. You can make beans as thick or smooth as you like.
Homemade Tortillas
2 cups white flour*
1t salt
¾ t baking powder
1/3 cup shortening
¾ cups warm water
Mix flour, salt, and baking powder. Cut in shortening until mixture resembles course crumbs. Slowly stir in water and fluff with fork until dough forms. Turn out onto floured surface. Kneed dough until it is smooth (about 10 times). Cover and let rest for 15 minutes. Pinch off a small ball of dough and roll out on floured surface. Tortillas should be thin and elastic about 10 inches in diameter. Cook on stove top, in un-greased iron skillet, nonstick pan, or electric grilled. Cook on one side until just barely brown, flip once and brown other side. Keep a tooth pick near by to poke out any large air bubbles.
* or 1 1/3 cups white flour and 2/3 cups whole wheat flour
Lets Eat!
Black Beans & Rice Recipe
Black Beans & Rice
1 cup chopped onion
1 cup chopped green bell pepper
2 tsp chopped garlic
1 1/2 tsp ground cumin
1 tsp dried thyme leaves
1/2 tsp crushed red pepper
1 bay leaf
1 TBSP olive oil
1 cup rice
1 can (14 1/2 oz) diced tomatoes with green chilies
1 can (15 oz) black beans or 1 1/2 cups cooked dry-packaged black beans (rinsed & drained)
2 cups water
1 TBSP apple cider vinegar
1/2 to 1 tsp salt (optional)
1/2 tsp black pepper
Saute onion, bell pepper, garlic, cumin, thyme, crushed red pepper, and bay leaf in olive oil until onion is tender, about 5 minutes. Stir in rice, tomatoes, black beans, water, vinegar, salt and pepper. Heat to boiling. Reduce heat and simmer, covered, until rice is tender, about 20 minutes. Let stand 5 minutes before serving.
Broth Simmered Rice Recipe
Broth Simmered Rice
Here is a super easy (and tasty) rice recipe using ingredients from your short-term food storage items. Recipe is from Campbell's Kitchen. com
1 can (1 3/4 cup) Chicken Broth
3/4 cup Long Grain White Rice (or just white rice)
Bring broth to a boil, stir in rice. Cover and simmer 20 minutes until done. Super easy and tastes great!
Tuesday, November 4, 2008
Snowman Soup
 Thanks to Countryheartdesigns.com for this cute tag she's made available for making Snowman soup. Since Hot Chocolate Mix is on sale this week. Here's this week's "recipe".
- 1 package hot chocolate mix
- 3 Hershey Kisses
- 10 mini-marshmallows
- 1 candy cane
Here's some other links to different styles of Snowman Soup:
- Organized Christmas
- Scrapping Mommy
- Craft Sayings (this one has a printable for "Freeze Dried Snowballs" (aka marshmallows)
Thursday, October 23, 2008
Farmer's Pork Chops
Since we have savings this week on Potatoes (.97 for 5 lb bag at Kings' Ranch), Onions (.33 lb at Sunflower Market) & Pork Chops (2.49 lb at Smiths). I thought this would be a perfect recipe to share. It's one of my FAVORITES!! I just love Paula Deen's recipes even if they aren't really low fat recipes :)
Farmer's Pork Chops
8 medium potatoes
1/2 medium onion
Salt & pepper, to taste
White sauce (see recipe below)
1 cup all-purpose flour
2 Tbsp Lawry's Seasoned Salt
8 center-cut pork chops, about 1/2 inch thick
1/3 cup vegetable oil
Preheat oven to 350 degrees. Peel potatoes; slice 1/4 inch thick and cover with cold water. Slice onion into very thin slices. Cut slices in half. Drain potatoes; layer half the potatoes in a well-greased 15 x 10-inch casserole dish. Sprinkle with salt and pepper to taste. Scatter half of onion slices on top of potatoes. Repeat with remaining potatoes and onions. Cover potatoes with white sauce. Cover casserole dish with plastic wrap and microwave for 5 minutes on high or
bake uncovered for 15 minutes. Mix together flour and seasoned salt and dredge pork chops in flour mixture. Lightly brown chops in vegetable oil. Do not cook them completely. As chops are removed from frying pan, lay them on top of potatoes. Bake at 350 degrees for 45-60 minutes. The juices from the pork chops will drip down into the potatoes. Delicious! Serves 8
White Sauce
8 Tbsp (1 stick) butter
1/2 cup all-purpose flour
1 to 2 tsp salt
1/2 to 3/4 tsp pepper
4 cups milk
1/4 cup chopped fresh parsley or chives (optional)
Melt butter; remove from heat. Stir in flour; add salt and pepper. Return to heat and cook, stirring constantly, until mixture is bubbly. Add milk, 1 cup at a time. Bring to boil over medium heat, stirring frequently. Reduce heat and simmer 1 to 2 minutes, then let stand at least 1 to 2 minutes. Stir in parsley or chives, if desired.
This recipe is from Paula Deen's cookbook "The Lady & Sons".
Monday, October 20, 2008
ABC's of Self-Reliance (SRS Meeting - October 2, 2008)
 ABC's of Self-Reliance
We had our 1st Self-Reliant Meeting of the season on October 2th! We had a great meeting and learned all the basics of becoming self-reliant. Here are some great documents to download that were available at our meeting:
Recipes from SRS Meeting - October 2, 2008
 Roasted Wheat Kernels
- 1/4 cup wheat berries (whole kernels of wheat)
- 1/2 TBSP oil
- 1/3 TBSP salt
Heat a small amount of oil in a skillet. Add wheat berries and pop like popcorn, They don't expand as much as popcorn, but the will pop. Swirl around in the pan to prevent burning. Sprinkle with salt while hot.
 Basic Granola
- 1 1/4 cups sugar
- 3/4 cups water
- 3 TBSP oil
- 3/4 tsp salt
- 5 cups rolled oats (uncooked)
In a pan combine the sugar, water, oil, and salt. Heat until sugar is dissolved, but do not boil. Pour syrup over the oats and stir until well coated. Add a little more rolled oats if the texture seems too moist. Place in pans or sheets about 1/2" deep. Bake at 425 for 20-30 minutes, stirring occasionally. Bake 15 minutes longer if you want it crunchier. Makes 5 cups. Store in an air tight container.
Cream of Bean Soup (not pictured)
- 1 1/4 cups dried pinto beans
- 2 TBSP oil
- 2 TBSP whole wheat flour
- 6 1/4 cups water
- 1/2 tsp salt
- 1/4 cup powdered milk
Sort through beans and discard rocks and any beans that are discolored or damaged. Add 3¾ cups of water to the beans and soak overnight (about 10 hours). To cook the beans, drain them, rinse them thoroughly, and cover them with water. Bring the water to a boil; then reduce heat and simmer for one or two hours or until the beans are tender. Adding one tablespoon of oil to the water will reduce foaming during cooking. Do not add salt or other ingredients until the beans have softened adequately. Drain the cooked beans. Add the flour to the oil and blend. Stir all remaining ingredients into the beans and cook on low heat until thickened. Makes 6 cups.
Danielle also added a few things to this basic soup recipe. They are:
- 1/2 can chicken broth (replace water)
- 1/4 cup diced carrots
- Onion powder
- Garlic powder
- Basil
- Pepper
All spices are to taste. Take off heat and add 3/4 cup cheddar cheese.
Friday, October 10, 2008
10 Tips for Food Storage
- Store what you eat. If you are allergic to wheat, then it's not the grain for you to store. Or if you just plain don't like say, split peas then don't store them.
- Keep track of what staples your family uses on a weekly/monthly basis. How long does a jar of peanut butter last at your house? Are you big milk drinkers? How long does a roll of toilet paper last on average? Calculate from these figures what your family needs for a year.
- Make a plan for what and how much extra you will buy each pay period. See Food Storage on $5.00 a week for examples (see side bar for current week).
- Eat what you store. Learn to use your food storage in every day cooking. Don't NOT store something because you don't know how to use it. Make it a goal to try something new once a week. When you've mastered new skills you'll be more likely to want to use them on a regular basis! Making menus also helps with this. It's easier to include storage items when you plan for them. By rotating in this way there is less likely to be waste.
- Bake bread - this alone will help you to rotate your wheat storage. It's also delicious, money saving and helps build your "digestive tolerance" for wheat.
- Take advantage of the cannery. The price and convenience can't be beat. When you order buy in multiples of 6 cans if you can. That way you get a box, making it easier to store!
- Seek out good information. Read it, study it, then use it! Check out the LDS bookstore, the Internet & the yellow pages.
- Buy the best equipment you can afford. It will make using your storage less discouraging, faster and a whole lot more fun. Though a hand grinder is better than no grinder!
- Take up camping. Not only is this a great excuse for getting preparedness equipment, you'll also have learned how to use it. And it makes for a cheap weekend get away.
- Just start somewhere. Maybe when your kids need new backpacks you'll snag the old ones for your 72 hour kits. Or start by planning what you need for a year. Or start by focusing on one of the basics and learn better how to use it. Maybe you'll even plant a garden...
JUST START
Where preparations are being made you will be blessed.
Thursday, October 9, 2008
Where Do I Store My Food Storage?
Here is a video that was done last year, that we added to this year. Here are various ways and places to store your food storage.
Kim lives in an apartment and has found great ways to maximize her space!
Rachelle and Holly both use their guest rooms as the housing place for their food storage.
There is nothing really special about how or where I (Lisa) store my food storage (it's just in a closet), however... last year I had NO food storage or 72 hour kits. I started coming to the Self-Reliant meetings that Tonya, Holly and Rachelle started, and it got me inspired AND smart about shopping. All the food storage that I have is from shopping smarter during my weekly shopping trips (and once a month Cannery). My grocery bill has actually gone down AND I have food storage!
This is my updated 2009 video with more food storage
Tonya uses the unique spaces in her house for food storage.
Amy converted part of her 3rd car garage into a food storage room.
Sunday, July 20, 2008
Subscribe Via Email!
 I have added Feedburner's "Subscribe Via Email" option on the sidebar. This way you can get new posts delivered directly to your inbox! I will also be posting the "Grocery Deals of the Week" in regular posts now, so that those will be delivered to your inbox also. A great feature!!
Sunday, July 6, 2008
Drought Preparedness
 There is a great article in Meridian Magazine called "Looking Ahead to Times of Drought" by Carolyn Nicolaysen. It is a great article on saving water and what we can do. Here are some highlights.
- Check for hidden water leaks. Record the reading on your water meter. After two hours, when no water is being used, check the meter again. If the meter does not read exactly the same, there is a leak.
- Install low-flow faucet aerators. All household faucets should be fit with an aerator. Since you use your faucet far more than any other water source in your home, aerators can provide the greatest savings. If your faucets do not have them, install them. If they have them, make sure they are rated at 2.75 gallons per minute or less. The rating will be on the side of the aerator.
- Take shorter showers. One way to cut down on water use is to turn off the shower after soaping up, then turn it back on to rinse. A four-minute shower uses 20 to 40 gallons of water. If you have kids, try setting a timer.
Don't forget to read the article in it's entirety here!
Wednesday, July 2, 2008
Sun Ovens and Grain Mills
 Country Living Grain Mill
Holly has some awesome Global Sun Ovens and the top rated Country Living Grain Mills available for purchase. Contact her directly for a special price.
 Global Sun Oven
Tuesday, July 1, 2008
TVP Hamburgers
TVP Hamburgers
4 lbs hamburger 80/20
2 eggs
1 ½ cup TVP (in granular form)
3 TBSP Worcestershire sauce
2 TBSP steak rub
1 pkg. onion soup (like liptons)
Mix together and make into patties and grill!
4 lbs hamburger 80/20
2 eggs
1 ½ cup TVP (in granular form)
3 TBSP Worcestershire sauce
2 TBSP steak rub
1 pkg. onion soup (like liptons)
Mix together and make into patties and grill!
Sunday, June 29, 2008
Summer Reading Programs
 Here are a few more FREE summer things to do! Here are 3 summer reading programs that are great to participate in!
 Barnes and Noble (grades 1-6 only) - 1. Read any 8 books. 2. Kids use the Summer Reading Journal to tell us their favorite part of each book. A parent/guardian signs it when it's complete. 3. Children bring their completed journal to a Barnes & Nobel Store between May 29th & September 2nd, 2008. 4. We'll give them a coupon for a FREE book! They choose from a list of exceptional paperback titles. **If you don't like the books they have to choose from, donate it to your school library!
Henderson Library (all ages) - Sign up online or in the library. You get cool prizes for reading!
Green Valley Library (youth & teens) - Teen Reading Program or Club Read for kids. Download your reading guide online and earn cool prizes!
Friday, June 27, 2008
Cooking from Storage? Let's Eat!
 I just found these great recipes from Emergency Essentials using your food storage items. I haven't tried any yet, so let me know if you do!
Here is one to try: Easy Lasagna Casserole
Ingredients:
1 1/2 Cup Freeze Dried Ground Beef*
1/4 Cup Freeze Dried Chopped Onion*
1 3/4 Cup Chunky Salsa Tomato Sauce
1 Teaspoon Italian Seasoning
2/3 Cup Dehydrated Fat-Free Milk*
1/2 Cup Water
1/2 Cup Fat-Free Cream Cheese
1/4 Teaspoon Minced Garlic
1 Teaspoon Dried Parsley Flakes
2 Cup Cooked Medium-Width Noodles
1/2 Cup Plus 1 Tablespoon Freeze Dried Shredded Mozzarella Cheese*
*Reconstitute before using
Preparation:
1. Preheat oven to 375°F.
2. Coat a large saucepan with olive oil flavored cooking spray and brown meat and onions in it.
3. Stir in tomato sauce and italian seasoning. Lower heat and simmer 10 minutes.
4. In a medium saucepan, combine milk, water, and cream cheese. Add garlic and parsley flakes.
5. Cook over medium heat, stirring constantly, until cream cheese melts. Stir in cooked noodles.
6. Pour noodle mixture into 8"x 8" baking dish sprayed with olive oil cooking spray.
7. Spread meat mixture evenly over noodle mixture. Sprinkle mozzarella.
8. Bake uncovered 15-20 minutes. Let sit 5 minutes before serving.
Sunday, June 22, 2008
Food Storage Cooking School "Use It or Lose It"
 Utah State University has complied an excellent book concerning food storage called Food Storage Cooking School "Use It or Lose It". Food Storage is broken down into very simple steps that makes food storage seem very possible. There are great recipes at the end of the book so you can use your food storage (now) and not lose it (later). It is a 124 page booklet that you are free to print copies of as long as you site your source. Thanks to Kira and her Greenway Self-Reliant Sisters blog for finding this great book!
Subscribe to:
Posts (Atom)

