Sunday, January 18, 2009

Sample 72 Hour Kit (with Pictures)

This is my families 72 hour kits. The kids have rolling backpacks and we have rolling duffel bags to hold more items. You can buy ready made kits, but I wanted to make our own so that I could personalize each one. Here are the things that we have in our 72 hour kits.

All of our 72 hour kits have a photo luggage tag, which contains a photo of them.

Food & Water

I decided to only buy food that doesn't need to be cooked. These food bars are from beprepared.com. I also supplement these food bars with our "comfort" foods, such as beef jerky, granola bars & candy. I also let the kids eat these every 6 months when I rotate certain perishable items. If you do buy items that need to be cooked, don't forget the camp stove, Sterno, can opener, pans for cooking, plates, bowls, cups, spoon, knifes, forks, etc for these items!


For our water I decided to purchase Water Pouches from beprepared.com. They also sell Aqua Blox, which is water in a juice box like container. I chose the pouches because of the size issue. The disadvantage to pouches is that they might puncture easier (thus they are in a Ziploc) and they are a little harder to drink from. I also have some water purification tables (not pictured) just in case we need water for more than 72 hours.

Clothing/Shelter

  • Emergency Sleeping Bag
  • Emergency Blanket
  • Poncho
  • Hot Hands or Hotties
  • I also have a full size sleeping bag (rated zero degrees) for all of us. These will NOT fit in our kits, but can slip over the handle and be pulled along with our backpacks & duffel bags.

I keep all our clothing items in the 2 duffel bag kits. The rolling backpacks are not large enough to hold these. I don't have a full change of clothes yet, so our clothing items consist of:

  • Socks
  • Shoes
  • Hats & Gloves
  • PJ's
  • Undergarments
  • Diapers (if applicable)

First Aid Items


I bought our 1st Aid kits premade from Wal-Mart. The small one (top picture) is in our children's backpacks, and the larger one and the Bite/Stink kit are in our kits. Some other things to add to this (if not already in your kit) might be:

  • Surgical Masks
  • Surgical Gloves
  • Cough Drops
  • Vitamins
  • Medicine (Cold/Pain)
  • Burn Gel & Dressing
  • Antiseptic
  • Inhalers or Prescription Medication (If you can't keep these in your kit, KNOW where they are so you can grab them quickly!)


Fuel, Heat & Lighting
  • Fire Sticks
  • Wind/Waterproof Matches
  • Emergency Candles
  • Flashlight
  • Lightsticks
  • Headlight
  • Fire Starter
  • Hand Crank Flashlight (I don't have one yet)

Make sure that you don't store your batteries in your flashlights or radios. Wrap them with tape so that the ends don't touch. This was they will be fresh when you need them.

Personal Documents (not pictured)
  • Immunization Records
  • Birth Certificates
  • Pictures
  • Phone Number/Addresses
  • Insurance Information (Life, Car, House)
  • Family Emergency Plan
  • CD's with Photos/Genealogy
  • Marriage Certificate
  • Social Security Numbers
  • Emergency Contacts
  • Family & Individual Photos
  • Fingerprints
  • Health Information
  • Credit Card Information with Phone Numbers
  • Cash in small bills
Personal Care Kit
I bought these small bags at Wal-Mart and filled them with everything we might need for our personal care. For deodorant, shampoo, toothpaste, and other things that have an expiration date, I bought each persons favorite brand. That way, if there is no emergency we can still use it here at home before it expires. Then I don't feel like I am wasting things, since I don't need to throw them away when they expire.

  • Germ X
  • Flushable Wipes
  • Chapstick
  • Deodorant
  • Toothpaste
  • Shampoo
  • Soap
  • Sunscreen
  • Washcloth
  • Toothbrush
  • Cotton Swabs
  • Comb
  • Kleenex
  • Toilet Seat Covers
  • Nail Brush
  • Tweezers
  • Finger Nail Clippers
  • Compact Mirror
  • Sewing Kit
  • Aloe Vera
  • Vaseline
  • Feminine Products
  • Mosquito Spray

Miscellaneous/Survival Items

  • Camp Towel
  • Toilet Paper (with roll removed)
  • Duck Tape
  • Handy Sacks (or trash bags)

  • Rope
  • Multipurpose Knife (Swiss Army, Leatherman, or Generic)
  • Heavy Duty Scissors
  • Survival Whistle (with compass)
  • Umbrella (don't have yet)
  • Maps (for neighboring states as well)

  • Camp Ax (adult kit)
  • Camp Shovel (adult kit)
  • Hand Crank Radio (don't have yet)
  • Work Gloves (don't have yet)

  • Corded Phone

This phone was about $5.78 at Wal-Mart and is a great buy. Phone lines have their own power source so if your power were to go out, you could still use this in case of emergency. Every home has a telephone interface box which is usually mounted on an outside wall where the phone lines runs into your house. You can plug your corded phone into this box (even if it's not your own home) and have a working phone line. Of course this is for EMERGENCIES ONLY!! Consider keeping a phone like this in your car, just in case!

Entertainment Items

Here is the special little section I have in each kit. It contains:
  • Small Notebook (in our favorite colors)
  • Pen & Pencil
  • Scriptures
  • Card Game (type varies per person)
  • Crayons/Coloring Book or other fun item

Extras

These are items that you probably can't store all the time in your 72 hour kit, and will have to grab at the last minute.

  • Medications
  • Cell Phones
  • Chargers
  • Special Blanket or Stuffed Animal that your child can't be without.

Large Item

These are things that would be great to have near your 72 hour kit, but are too big to fit inside a backpack.

  • Portable Toilet
  • Porta Privy
  • Family Size Tent (Such as one you use to go camping every summer)
  • Camp Stove
  • Sleeping Mats

Recipes from SRS Meeting - January 8, 2009

Greek Pasta Salad

12 oz bag of Tri-colored spiral pasta
15 oz can three bean salad (with liquid)
4 oz can black olives (drain liquid)
5 or 6 artichoke hearts cut into bite-sized pieces (add 1/2 tsp. of the oil that the artichokes come in)

Sprinkle with a dash of Parmesan or Romano cheese. Use feta cheese if available. Cook pasta according to directions. Add rest of ingredients.


Ramen Casserole

2 cans of any vegetables you like
2 packages of Ramen (we prefer Chicken flavor)

Drain the liquid from the cans into a large saucepan and bring to a boil. Add the Ramen noodles and sauce packets. Stir until Ramen is soft. Add all of the vegetables and heat thoroughly.

Preparation and cooking time is less than ten minutes. This feeds two adults and three children.

Variations using different flavors of Ramen combined with different canned ingredients are easy.


Peanut Butter Balls

Remember: 1/4, 1/3, 1/2 and increase proportionally.

1/4 cup honey
1/3 cup peanut butter
1/2 cup powdered milk

Can add 1/3 cup coconut, if you like.

"All you do is mix these ingredients together and shape into balls and EAT!! Great for the sweet tooth and nutritious. I've also experimented and added protein powder for some of the powdered milk."


Egg substitute

Before starting recipe for cookies, cake, etc., combine 1 teaspoon unflavored gelatin with 3 tablespoons cold water & 2 tablespoons plus 1 teaspoon boiling water. This mixture will substitute for 1 egg in a recipe

Emergency Preparedness (SRS Meeting - January 8, 2009)

Natural Disaster at Home

Flash Floods
During a flash flood, water can rise so quickly that there is little or no time for a warning to be issued and you may have only seconds to escape. It only takes two feet of water to carry away cars. Six inches of swiftly moving water will sweep a person off his/her feet. If you suspect a flash flood is about to happen, immediately climb to higher ground.

Earthquakes
If you are indoors, and feel an earthquake the first thing to do is look up and around and get your bearings. Find cover and duck under a sturdy desk, table or other furniture. Hold on to it and move with it. If you are outside, get into the open, away from buildings and power lines

Wildfires
Wildfires often begin unnoticed and spread quickly, Plan with your family where you would go and what you would do if you are threatened. Listen to your battery operated radio for updates and instructions.


Family Emergency Plans

Meet with your family and discuss why you need to prepare for disaster. Explain the dangers of fire, severe weather, and earthquakes to children. Plan to share responsibilities and work together as a team.

Discuss the types of disasters that are most likely to happen. Explain what to do in each case.
Pick two places to meet:

  • Right outside your home in case of a sudden emergency, like a fire.
  • Outside your neighborhood in case you can't return home. Everyone must know the address and phone number.

Ask an out-of-state friend to be your "family contact." After a disaster, it's often easier to call long distance. Other family members should call this person and tell them where they are. Everyone must know your contact's phone number.

Discuss what to do in an evacuation. Plan how to take care of your pets.

Complete this Check list

  • Post emergency telephone numbers by phones (fire, police, ambulance, etc.).
  • Teach children how and when to call 9-1-1 or your local Emergency Medical Services number for emergency help.
  • Show each family member how and when to turn off the utilities (water, gas, and electricity) at the main switches.
  • Check if you have adequate insurance coverage.
  • Get training from the fire department for each family member on how to use the fire extinguisher (ABC type), and show them where it's kept.
  • Install smoke detectors on each level of your home, especially near bedrooms.
  • Conduct a home hazard hunt.
  • Stock emergency supplies and assemble a Disaster Suplies Kit (72 hour kit).
  • Take a Red Cross first aid and CPR class.
  • Determine the best escape routes from your home. Find two ways out of each room.
  • Find the safe places in your home for each type of disaster.
  • Practice and Maintain Your Plan
  • Quiz your kids every six months or so.
  • Conduct fire and emergency evacuations.
  • Replace stored water and stored food every six months.
  • Test and recharge your fire extinguisher(s) according to manufacturer's instructions.
  • Test your smoke detectors monthly and change the batteries at least once a year.

www.redcross.org/services/disater/0,1082,0_601_,00.html

Disaster Kits— from FEMA

Basic Disaster Supplies

There are six basics you should stock in your home:

  • Water
  • Food
  • First aid supplies
  • Clothing, bedding and sanitation supplies
  • Tools
  • Special items

Keep the items that you would most likely need during an evacuation in an easy-to-carry container. Possible containers include a large, covered trash container; a camping backpack; or a duffle bag.

Special Items

For Baby

  • Formula
  • Diapers
  • Bottles
  • Pacifiers
  • Powdered milk
  • Medications

For Adults

  • Heart and high blood pressure medication
  • Insulin
  • Prescription drugs
  • Denture needs
  • Contact lenses and supplies
  • Extra eye glasses
  • Hearing aid batteries

Important Family Documents (Keep these records in a waterproof, portable container. )

  • Will, insurance policies, contracts, deeds, stocks and bonds
  • Photo IDs, passports, social security cards, immunization records
  • Bank account numbers
  • Credit card account numbers and companies
  • Inventory of valuable household goods, important telephone numbers
  • Family records (birth, marriage, death certificates)
  • Photocopies of credit and identification cards
Cash and coins.

Entertainment--games and books.

Water and Food

Store at least a three-day supply of non-perishable food. Select foods that require no refrigeration, preparation or cooking and little or no water. If you must heat food, pack a can of sterno. Select food items that are compact and lightweight. Avoid foods that will make you thirsty. Choose salt-free crackers, whole grain cereals, and canned foods with high liquid content.
*Include a selection of the following foods in your Disaster Supplies Kit:
Note: Be sure to include a manual can opener.


  • Ready-to-eat canned meats, fruits and vegetables
  • Canned juices, milk, soup (if powdered, store extra water)
  • Staples--sugar, salt, pepper
  • High energy foods--peanut butter, jelly, crackers, granola bars, trail mix
  • Vitamins
  • Foods for infants, elderly persons or persons with special dietary needs
  • Comfort/stress foods--cookies, hard candy, sweetened cereals, lollipops, instant coffee, tea bags

Water

You should have at least a three-day supply of water and you should store at least one gallon of water per person per day. A normally active person needs at least one-half gallon of water daily just for drinking. Additionally, in determining adequate quantities, take the following into account:

  • Individual needs vary, depending on age, physical condition, activity, diet, and climate.
  • Children, nursing mothers, and ill people need more water.
  • Very hot temperatures can double the amount of water needed.
  • A medical emergency might require additional water.

Clothing, Sanitation Supplies, and Documents

If you live in a cold climate, you must think about warmth. It is possible that you will not have heat. *Include at least one complete change of clothing and footwear per person.

  • Jacket or coat
  • Long pants
  • Long sleeve shirt
  • Sturdy shoes or work boots
  • Hat, gloves and scarf
  • Rain gear
  • Thermal underwear
  • Blankets or sleeping bag
  • Sunglasses
  • Toilet paper
  • Soap, liquid detergent
  • Feminine supplies
  • Personal hygiene items
  • Plastic garbage bags, ties (for personal sanitation uses)
  • Plastic bucket with tight lid
  • Disinfectant
  • Household chlorine bleach

Important Family Documents

Keep these records in a waterproof, portable container.

  • Will, insurance policies, etc.
  • Photo IDs, passports, social security cards, immunization records
  • Bank account numbers
  • Credit card account numbers and companies
  • Inventory of valuable household goods, important telephone numbers
  • Family records (birth, marriage, death certificates)
  • Photocopies of credit and identification cards

First Aid Kit

Assemble a first aid kit for your home and one for each car. A first aid kit should include:

  • Sterile adhesive bandages in assorted sizes
  • 2-inch sterile gauze pads (4-6)
  • 4-inch sterile gauze pads (4-6)
  • Hypoallergenic adhesive tape
  • Triangular bandages (3)
  • 2-inch sterile roller bandages (3 rolls)
  • 3-inch sterile roller bandages (3 rolls)
  • Scissors
  • Tweezers
  • Needle
  • Moistened towelettes
  • Antiseptic
  • Thermometer
  • Tongue blades (2)
  • Tube of petroleum jelly or other lubricant
  • Assorted sizes of safety pins
  • Cleansing agent/soap
  • Latex gloves (2 pair) Sunscreen
  • Non-prescription drugs
  • Aspirin or nonaspirin pain reliever
  • Anti-diarrhea medication
  • Antacid (for stomach upset)
  • Syrup of Ipecac (use to induce vomiting if advised by the Poison Control Center)
  • Laxative
  • Activated charcoal (use if advised by the Poison Control Center)
  • Contact your local American Cross chapter to obtain a basic first aid manual.

http://www.fema.gov/plan/prepare/basickit.shtm

Thursday, December 18, 2008

"Let's Play" Entertainment Book for Kids

Here's a super cool book that Danielle put together. It's called "Let's Play" and it includes tons of ideas and activities that keep kids entertained. Here's the downloadable link in PDF format and Publisher format. Thanks Danielle!!

Sunday, December 14, 2008

Emergency Preparedness Gifts

A great gift to give this season is a gift of Emergency Preparedness. Beprepared.com has many gifts to start or finish a 72 hour kit or car kit. A Cub Scout or Boy Scout would love any of these items on the list. They are great for camping and emergency survival! Here are some examples of some great inexpensive presents.
  • Magnesium Fire Starter - $6.95
  • Fire Sticks - $1.95
  • Fire Lighters - $2.95
  • Waterproof/Windproof Matches - $2.95
  • Hotties - .95 to $1.25
  • Emergency Blanket - $1.25
  • Emergency Poncho - .75
  • Deluxe Poncho - $2.95
  • Endurance Headlamp - $4.95
  • Flashlight - $7.99
  • Emergency Tent - $3.95
  • 13-Function Knife - $1.99
  • Multifunction Tool - $4.95
  • 5-in-1 Survival Whistle - $1.50
  • 1st Aid Kit - $5.95
  • Basic 72 Hour Kit - $9.50

Of course prices are subject to change.

Wednesday, December 10, 2008

Inexpensive Christmas Gifts (SRS Meeting - December 4, 2008)

We had a great meeting on Thursday learning all about inexpensive Christmas gifts and great dessert recipes made from food storage.

Neighborhood Gift Ideas (Deseret News, November 15, 2006)

  • Bag of mini carrots and veggie dip - We know you are 24 "carrot" neighbors! What a treasure! Have a happy holiday!
  • Set of measuring spoons and cups - Wishing you joy beyond "measure" this holiday season.
  • Bag of pistachios or peanuts in shells - Don't go "nuts" this Christmas! From your "nutty" neighbors.
  • Christmas paper plates, napkins, cups and plastic utensils -- A bit of "disposable" Christmas cheer! What could be better? No dishes, my dear!
  • Bolt of Christmas ribbon & wrapping paper - This simple gift is meant to help you "tie" up those loose ends this Christmas season!
  • Mittens (fill with tape, scissors, tags and pen) - Let us "lend" you a "hand" this Christmas season!
  • Christmas Cookie cutter - "Cutting" out a perfect Christmas wish for you.
  • Flashlight - We love how you "light up" our lives. We've come to depend on your "glow." Here's a flashlight to store, so you'll always be sure to create "light" wherever you go!
  • Bounty paper towels - This season may the "absorbing" spirit of Christ "blot" out your problems, "soak up" your sorrows, and "wipe" away your difficulties and may the new year bring you "bounteous" blessings all the year through!
Gifts from the Heart ("Idea List: Priceless Gifts," Liahona, December 2002)

Gifts from the heart are far more valuable than anything you could ever buy. They often take more energy, thought, and sacrifice, so they mean more to both the giver and the receiver. Here are some ideas for priceless gifts you can give this Christmas.

  • Give the gift of yourself to your family and loved ones. Spend the day doing kind things for your parents and siblings. You could make breakfast, help wrap and deliver presents, or clean up after dinner.
  • Give your parents a break. Spend some time looking after your younger brothers and sisters during the Christmas holiday.
  • Volunteer at a local food bank or shelter, or help with some other worthy cause.
  • Visit someone who is sick or elderly. Ask him or her to tell you about a past Christmas.
  • Express your love and gratitude for the Savior in your prayers.
  • Christmas is a time for peace. Try to resolve differences with someone you don’t get along with very well.
  • You can also encourage peace by not quarreling with your siblings. Try to treat your family as well as you possibly can.
  • Write a letter to your parents thanking them for the things they have done for you.
  • Write letters to full-time missionaries from your ward or branch to encourage them and to let them know you remember them in your prayers.
  • Make your brother’s or sister’s bed without letting anyone know who did it.
  • Baby-sit for free so parents can enjoy an outing to a Christmas concert, attend the temple, or spend time together.
  • Read the Christmas story to a younger brother or sister, and teach them about the Savior (see Luke 2).
  • If you’ve saved some money by giving free gifts this Christmas, you can pay a generous fast offering next month.

Homemade Gifts (Gene R. Cook, "Homemade Christmas" Liahona, December 2003)

What the true spirit of Christmas is all about—commemorating Jesus’ birth and enjoying the spirit of giving, loving, and caring for one another—seemed to be drowned out, at least for us, in the hustle and bustle. We felt great pressure to buy gifts for others, perhaps more out of obligation than in the true spirit of giving.

We asked ourselves how we could put the true spirit of giving into Christmas (and birthdays) more than we normally did. We decided to use the following guidelines:

1. Few, if any, gifts may be purchased.

2. Most gifts must be made using your own hands or given from your own time.

3. Few, if any, parts for the gifts may be purchased. You must improvise.

4. You must give of your own time, talents, and self, immersing yourself in the needs of the receiver.

This has been a great experience for our family. We have found that in following such rules we think more deeply about, even pray about, the person to determine what his or her real needs and wants are. Working on a meaningful gift many months before birthdays or Christmas helps us internalize the spirit of giving. This method has also helped us realize that we can be more self-sufficient than we thought.

Gift Certificates to Neighbors

There are other kinds of gifts that we give to neighbors and friends. We call them family gift certificates. On a piece of paper, we draw up a certificate that lists the person’s name and indicates a service to be given. Some of the certificates show the following:

  • One free shoveling of snow from a driveway
  • One free lawn-mowing job
  • One free garage cleaning
  • One free car wash
  • One free piano recital from one of our children
  • Two free loaves of bread (not from Mom, but from the children)
  • Free baby-sitting
  • Two hours of repair work for a widow
  • One free fireside to teach the gospel

Again, these personal kinds of gifts carry extra meaning.

Gift Certificates to Family Members

We give these same kinds of gift certificates to family members, including the following:

  • Make your bed seven times (exchanged among the children)
  • Do the dishes three times at any time you want to redeem the certificate
  • One hour at the piano with Dad singing
  • One mountain trip
  • Clean the garage for you
  • Six one-hour periods alone with Mom or Dad
  • Six one-hour times of peace and harmony (offered to Dad and Mom)
  • Twelve letters, one per month, for a year (offered to a distant mother)

Here are some great inexpensive Christmas gifts that were shared at our meeting!!

No Sew Tutu (except for the elastic) & Superhero Cape
Danielle made these super cute and super awesome tutu and cape for her kids. Here's a tutorial for the No Sew Tutu and here's how you make this super easy superhero cape. You will need

3/4 yard of superhero fabric (45/46" wide)
matching thread
sewing machine

Your fabric should be 27" long by 45/46" wide. Cut a 1" strip of fabric off of the 45/46" long, so that your fabric now measures 26" by 45/46". This 1" strip will be used for the cape tie. Gather the 45/46" side so that it now measures 10" long (lots of gathers!). Find the center of your tie and the center of the stitches and match them up wrong sides together. Sew 1/4" seams. Fold tie around to other side of cape, press and then topstitch down. Hem bottom of cape with a rolled hem. Viola! Instant superhero.

Growth Chart

This is a great growth chart that works great in apartments since you can take it with you when you move. Paint a 6 foot by 9 inch wide board in the color of your choice. Stencil the numbers 1-6 every foot and then make a small mark for each inch in between, or each 6 inches.


Attach a picture hanger to the back and you're ready to go!
Here's the supplies for mine. I bought a 6' piece of crown or base molding (instead of a wooden board) and bought 3" wooden numbers (instead of stenciling). Now I just have to stain it and attach the numbers!


Personalized ABC or Word Books
Danielle made each of her children their own personalized books. Each page has a different letter or word made with pictures of her children. She laminated each book for durability and also had them spiral bound. Here's some sample pages from their books.


Scrapbook Journal
Take a composition notebook and make it into a personalized gift by adding scrapbook paper and embellishments. An easy beautiful gift! Here's a great quote to put inside the front cover.

The Value of Keeping a Journal

"People often use the excuse that their lives are uneventful and nobody would be interested in what they have done. But I promise you that if you will keep your journals and records, they will indeed be a source of great inspiration to your families, to your children, your grandchildren, and others, on through the generations. Each of us is important to those who are near and dear to us—and as our posterity read of our life's experiences, they, too, will come to know and love us. And in that glorious day when our families are together in the eternities, we will already be acquainted."


-President Spencer W. Kimball

"Let's Play" Entertainment Book for Kids

Here's a super cool book that Danielle put together. It's called "Let's Play" and it includes tons of ideas and activities that keep kids entertained. Check back in a few days for the downloadable link for her book. Thanks Danielle!!

Handmade Cards
Make a variety of handmade cards from scrapbook paper. Some ideas are birthday, thank you, thinking of you, miss you, get well soon, anniversary, & sympathy. Bundle these up and give as a Christmas gift. This is a gift they can use throughout the year!

Magnet Words
Buy some inexpensive clear rocks at Wal-mart or a local craft store. Print fun words or your child's name on some scrapbook paper. Cut out the paper to the shape of the rock and attach a magnet on the back. Great fun for the fridge and the kids!


Gifts in a Jar (or bag) There are so many different mixes that you can give in a jar. Search "gifts in a jar" and you will get tons of results on the Internet. My favorite idea spot for these is Organized Christmas.

Anjalique puts her "Granola in a Jar" in a bag, so that it won't break while mailing. To make this cute (almost no sew) bag you will need:

Fabric 20" tall by 9 wide
Ribbon 18-20" long.

Fold the fabric in half so that it measures 10" x 9". Sew up the 2 10" sides wrong sides together, using 1/4" seam allowance. Now your bag should measure 10x8. Now carefully cut 1/2" slits approximately 1 1/2" down from the top of the bag and approximately 1/2" apart. Thread ribbon into slits and your bag is done.

Fill a Ziploc with the "gift in a jar" ingredients, slip into your bag and tie closed.
Anjalique also includes a double sided gift tag. One side has the instructions for making the granola from the ingredients in the bag
How to make this granola:

Dump contents of bag into a large bowl and stir. In a separate bowl, combine 1/4 + 2 TBSP honey (or maple syrup), 1/4 cup oil, and 1/4 tsp salt. Combine both mixtures and pour onto one large or two small cookie sheets. Cook 30-35 minutes, stirring halfway through to achieve an even color. Remove from oven and transfer into a large bowl. Stir in 1 cup raisins, if desired. Then, enjoy!

and the other side has the instructions for making the granola from scratch.
Granola (from scratch)

3 cups rolled oats
1 cup sliced almonds (or any amount)
3/4 cup shredded sweet coconut
1/4 cup + 2 Tbsp. brown sugar
1/4 cup + 2 Tbsp. honey (or maple syrup)
1/4 cup vegetable oil
1/4 tsp. salt

Preheat oven to 250º. In a large bowl, combine oats, nuts, coconut, and brown sugar. In a separate bowl, combine honey, oil, and salt. Combine both mixtures and pour onto one large or two small cookie sheets. Cook 30-35 minutes, stirring halfway through cooking to achieve even color. Remove from oven. (Optional: Transfer to large bowl and stir in 1 cup raisins,)

Another "Gift in a Jar" is to give a refillable Tupperware for a family member. This one is filled with different rice recipes, and whenever it runs empty, it can be returned for a refill. What a great idea!

As an alternative to giving cookies and chocolates, you can give a bag of homemade noodles.


Basic Egg Noodle recipe

2 Tbsp oil
4 large eggs
1 Tbsp water
3 1/2 cups flour

Place eggs, water, and flour in a bowl. Beat with flat beater. Turn to Speed 2 and mix 30 seconds. Remove flat beater and attach dough hook. Turn to Speed 2 and knead for 2 minutes. Hand knead dough for 30 seconds to 1 minute. Cover with a dry towel and let rest 15 min. Roll it out on a counter until it is paper thin and cut i strips or desired size or put it through the pasta maker. IF you are giving as a gift make sure they are dried completely.

Mint Candy Ornaments
Here's a great tutorial on how to make these simple and cute ornaments for the tree!

Personal History Gift

A gift of your personal history or someone is your family is always such a cherished, memoriable gift.

Cookbook

Many people loved the idea of a homemade cookbook to give or receive as a gift. Here are some great ideas for your own recipe book.
  • Scan in the original handwritten recipe and include that along with the typewritten recipe.
  • Put all recipes in a 3 ring binder to make it easy to add new pages.
  • Include pictures of the event where the dish was served or a picture of the person who usually makes the dish
  • Include stories about the dish/recipe
  • Include a Table of Contents (if possible)

  • Place recipes in protective sleeves to keep them safe in the kitchen
  • You can also include a cute accessory with your cookbook gift. Anjalique filled these wisks with chocolate candy to go with her cookbook.

Emergency Pocket Kit


This is a cute little emergency kit that I saw in an Etsy shop. It was such a cute and simple idea that I thought I'd make a few for Christmas this year. It was easy, except that the Ziploc bags are really slippery! It's a little bag that's filled with items of your choice (Band-Aids, wet wipes, medicine, Kleenex, safety pins, cough drops, toilet seat cover, etc). Here's the tutorial for this little kit.
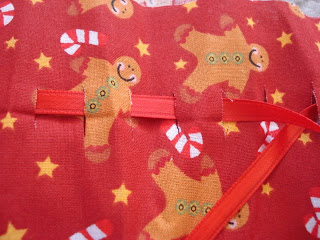
Crayon Rolls

Skip to my Lou has a great tutorial on making these cute and simple crayon rolls. Doesn't every child needs one of these?


Recycled Crayons

Crafty Dasies has a great tutorial on making recycled crayons. I made the above crayons by using her tutorial and a muffin tin. I also made snowman crayons by using a candy/ice mold and the microwave. Here's how:

Put "like color" crayon pieces into a microwave safe cup/mug and heat for 30 seconds to 2 minutes, depending on how many crayon pieces you have in the mug. When it's melted, pour into a cute shaped ice cube tray or candy mold. I found my snowman and santa ones at Deseret Industries for .50 each. Don't use ones that you love or paid a lot of money for, because mine broke when I pulled it out of the freezer.

Aren't these snowmen so cute!!! I love them!!


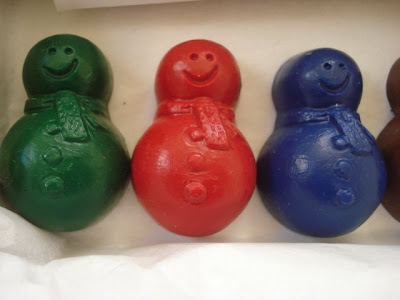
For the snowmen, I found a tin that fit the 8 colors perfectly and had some room to spare for a few sheets of blank paper (rolled up and tied) for coloring. This one is for my nephew :)

Recipes from SRS Meeting - December 4, 2008

We had so many wonderful recipes to try at our SRS Meeting on Thursday! Here they are for you to try!

Candy Cane Marshmallows

Use the basic vanilla marshmallows (found here). Add 2 1/3 cups sugar to the mix & then add 2/3 cup candy cane at the VERY end, right before pouring.


Magic Milk Shakes

1 1/2 - 2 cups ICE water- really, really cold.
1 1/4 cups non-fat dry milk powder
2/3 cup sugar
1/3 cup unsweetened cocoa
2-3 cups ice cubes
2 TBSP vegetable oil (it’s an emulsifier)

Place ALL the ingredients in the blender, including the oil. Use less water for a thicker milkshake or more for a shake that’s easier on your blender motor. With lid on, process for two minutes. Makes about 4 shakes.

Granola

3 cups rolled oats
1 cup sliced almonds (or any amount)
3/4 cup shredded sweet coconut
1/4 cup + 2 Tbsp. brown sugar
1/4 cup + 2 Tbsp. honey (or maple syrup)
1/4 cup vegetable oil
1/4 tsp. salt

Preheat oven to 250º. In a large bowl, combine oats, nuts, coconut, and brown sugar. In a separate bowl, combine honey, oil, and salt. Combine both mixtures and pour onto one large or two small cookie sheets. Cook 30-35 minutes, stirring halfway through cooking to achieve even color. Remove from oven. (Optional: Transfer to large bowl and stir in 1 cup raisins,)

Oatmeal Cranberry White Chocolate Chip Cookies

2/3 cup white beans mashed
2/3 cup brown sugar
2 large eggs
1 1/2 cups old-fashioned oats
1 1/2 cups flour
1 tsp baking soda
1/2 tsp salt
1 (6 oz) package Ocean Spray Craisins Original Sweetened Dried Cranberries
2/3 cup white chocolate chunks or chips

Preheat oven to 375ºF. Using an electric mixer, beat butter or margarine and sugar together in a medium mixing bowl until light and fluffy. Add eggs, mixing well. Combine oats, flour, baking soda and salt in a separate mixing bowl. Add to butter mixture in several additions, mixing well after each addition. Stir in sweetened dried cranberries and white chocolate chunks.
Drop by rounded teaspoonfuls onto ungreased cookie sheets. Bake for 10-12 minutes or until golden brown. Cool on wire rack. Makes approximately 2 1/2 dozen cookies. (Bean Substitution 1 to 1 beans for butter)

Pinto Bean Fudge

1 cup cooked, soft pinto beans, drained & mashed
1/4 cup milk
1 TBSP vanilla
2 lbs powder sugar
6 oz unsweetened chocolate
6 TBSP butter or margarine
Nuts (optional)

In a large bowl stir beans and milk together, adding enough milk to resemble mashed potatoes in consistency; stir in vanilla. Melt chocolate and butter and stir into bean mixture. Add nuts. Gradually stir in powdered sugar to get it well blended. Spread onto lightly buttered 9 inch baking dish or form into two 1 1/2 inch rolls chill 1 to 2 hours. Cut into pieces. Refrigerate.

Cinnamon-Raisin Bars

½ cup butter
1 cup brown sugar
½ tsp salt
½ tsp soda
1 ½ cup flour
1 ½ cup quick oats
Raisin Filling
Cinnamon Icing

Cream Butter and sugar. Sift together dry ingredients; stir into creamed mixture. Add oats and 1 Tbsp water. Mix until crumbly. Firmly pat half the mixture in greased 9 x 13 pan. Spread with Raisin Filling. Mix remaining crumbs and 1 Tbsp water; spoon over filling; pat smooth. Bake in oven about 35 min at 350 degrees. Cool. Drizzle with Cinnamon Icing. Makes 2 ½ dozen.

Raisin Filling:
Combine ¼ cup granulated sugar and 1 Tbsp cornstarch in saucepan. Stir in 1 cup water and 2 cups raisins. Cook over medium heat till thickened and bubbly. Cool.

Cinnamon Icing:
Mix 1 cup sifted powdered sugar with ¼ tsp ground cinnamon. Stir in enough milk, about 1 Tbsp, for drizzling.